Sunday, July 15, 2012

Blue Ombre Vanilla Layer Cake with Buttercream Frosting and Berries

13th July 2012, my late father's 57th birthday. 


This year, his birthday was a little different from the previous years. My family and I decided to host a small gathering in his memory. Everyone contributed and did their part in bringing this party together and I must say, we never worked better as a team, as a family. Mom, sis and kakak Pam made all his favourite food (including five-spice duck, purple spinach soup, his favourite Sarawak noodles and cornbeef noodles), while big brother went to buy some food from his favourite restaurants (Sam Yu and Jaya Palace). 
I was given the opportunity to make his birthday cake. And it came to me in a dream (literally!), blue ombre cake, since blue was his favourite colour.

So this one's for you, papa. Because without you and mom, I wouldn't have had a better life. I love you, and we will meet again one day. 

Cake 
Ingredients
- 650g self-raising flour (or 630g all-purpose/plain flour + 2 tbsp baking powder)
- 1 tsp salt (you can add a tad bit more for a cake that is less sweet)
- 340g unsalted butter, room temperature (you can cut your butter into smaller cubes for it to soften faster)
- 540g caster sugar
- 9 egg whites, room temperature
- 2 cups milk or buttermilk
- 1 vanilla bean stalk, center split and scraped
- 1 tsp vanilla extract
- food colouring (any colour you like!)
- food liquid whitener (this is used to whiten your batter as it is originally pale yellow in colour and will affect your end results if it's not used)

Steps
1. Preheat oven to 350°F (175°C). Butter and line 5 cake tins (I used a 20cm cake tin) if you have 5, I don't, so I just did each layer one by one.
2. In an electric mixer, cream butter and sugar on medium/high speed for about 3-5 minutes, until it is pale and fluffy.
3. Lower the speed, add egg whites gradually, mixing until fully incorporated.
4. Sift self-raising flour ( or plain flour + baking powder) and salt in a bowl. In another bowl, mix vanilla seeds, vanilla extract and milk (or buttermilk).
5. Alternating between flour mixture and milk mixture, add to butter mixture. Mix gently until just incorporated. Do not overmix.
6. Weigh the whole batter and divide it by the number of layers you want to make (I used 500g for each layer as I had 1kg of batter and wanted to make 4 layers). 
7. Pour batter into individual bowls. Add liquid whitener into each bowl and mix gently.


8. Pour cake mix into prepared cake tins, even the batter out and bake for 15-20 minutes. Cake is cooked when an inserted skewer comes out clean. Cool in tin for 10 minutes, transfer to wire rack to cool completely (I placed them in the fridge after cooling so that it is easier to ice).
9. Repeat with other layers.

Buttercream Frosting 
Original recipe : http://savorysweetlife.com/2010/03/buttercream-frosting/
Ingredients
- 340g unsalted butter, softened (1 cup butter = 113.4g butter)
- 9 cups confectioner's sugar (icing sugar), sifted
- 3/4 tsp table salt
- 3 tbsp vanilla extract
- approximately 3/4 cup milk or heavy cream (depending on the consistency you want)


Steps
1. Beat butter for a few minutes with a mixer with the paddle attachment on medium speed. 
2. Turn your mixer to lowest speed (so the sugar doesn’t blow everywhere) and add sifted sugar until sugar has been incorporated with butter.
3. Increase mixer speed to medium and add vanilla extract, salt, and 2 tablespoons of milk/cream and beat for 3 minutes. 
If your frosting needs a more stiff consistency, add remaining sugar. If your frosting needs to be thinned out, add remaining milk 1 tablespoons at a time.


Never beat your buttercream for more than 7 minutes in total.

To fill and coat the cake :
I watched Donna Hay demonstrate her method of icing a cake on Masterchef Australia and that helped me alot. Try to find the video or catch it on tv if you can! 


Make sure you have a cake that is cold, and icing that is warm (soft) to ice the cake easily.

1. Place the bottom-most layer on a cake board and place it on a cake turner. Ensure that it is on the centre of the cake board.
If your layers are uneven, even them out using a breadknife/chef's knife, or a cake leveler if you have one.
2. Brush away any crumbs on the layers using a pastry brush (you want the cake to be clean so you don't drag any crumbs while you are icing it).
3. Measure out the amount of icing you use for each layer (I used 1 cup of icing for each layer) to get even layers.
4. Place the icing in the middle of the cake and spread it outwards with left and right motions using a spatula (this comes with tons of practice). 
5. Repeat with all the other layers.
6. Use remaining frosting to coat the top and sides. I didn't have enough buttercream frosting (hence the visible cake from the outside). :( 
7. Top with anything you like. Fruits, edible flowers, gumpaste flowers, etc. Be creative!


Hard at work. 


Finished product! 


Not too shabby frosting for a first time. :D
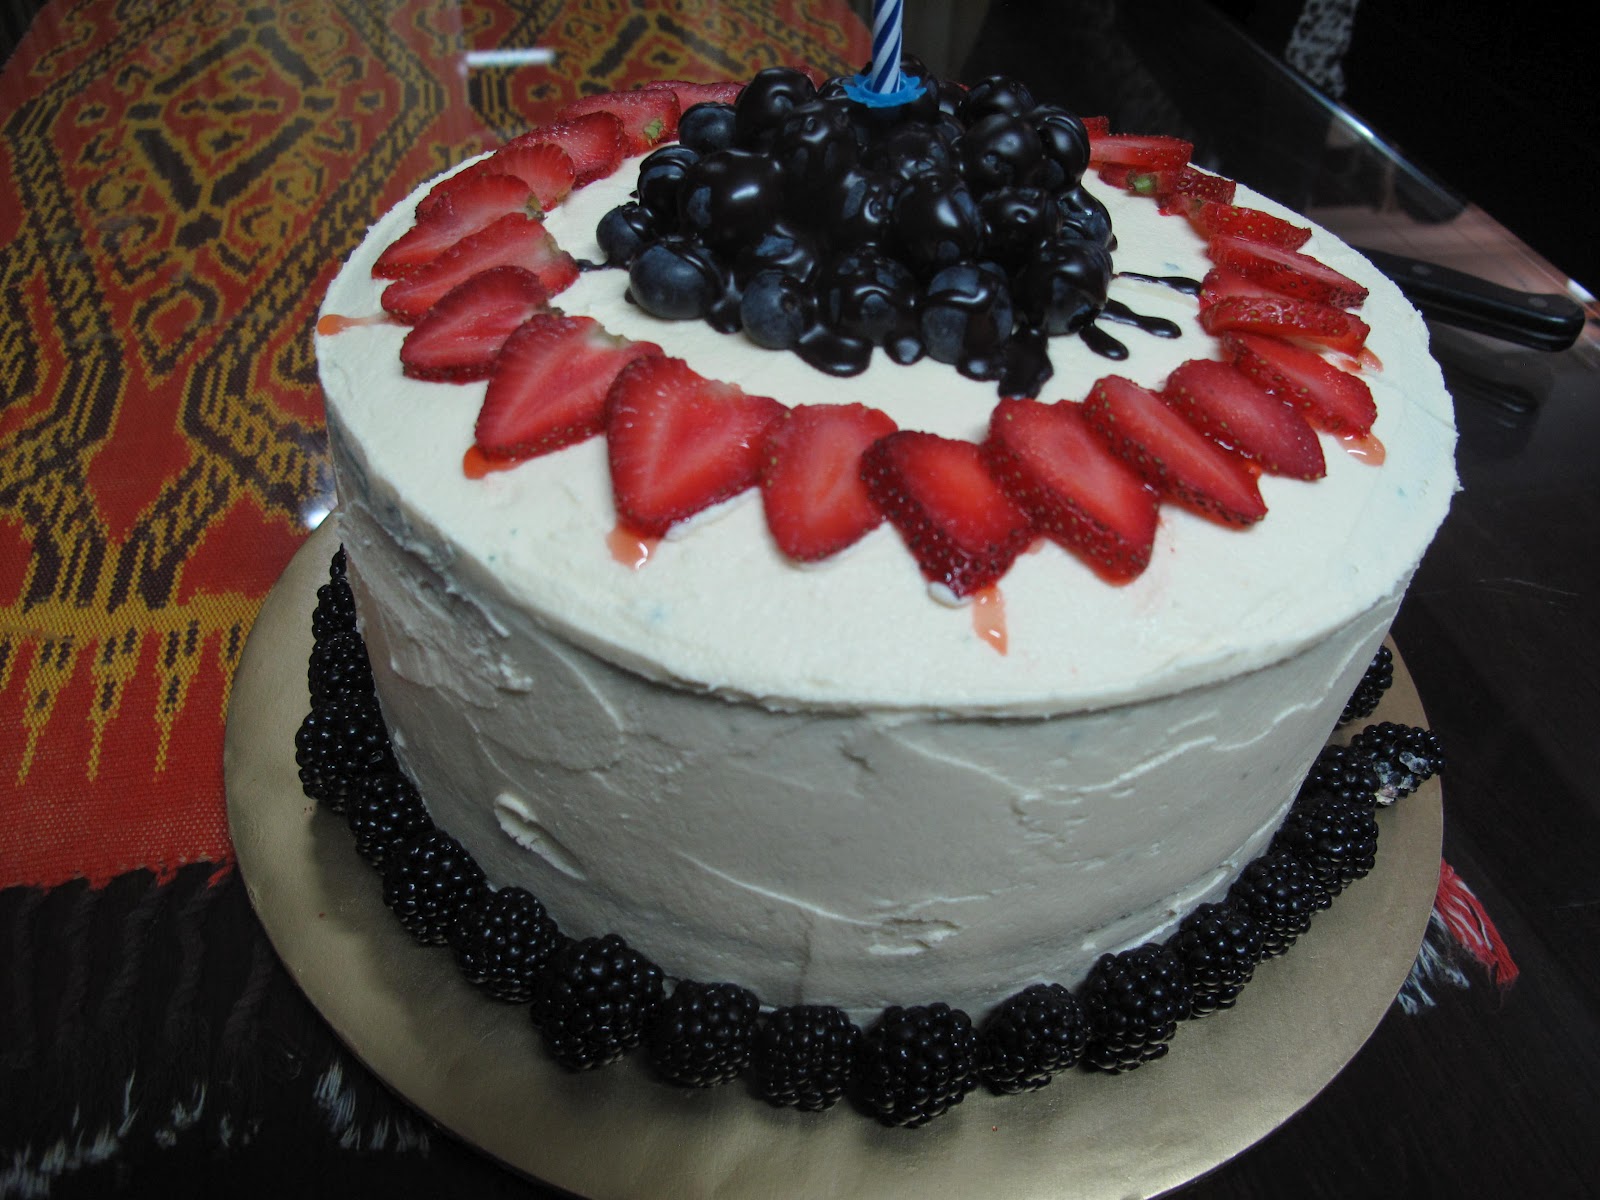

Outside. Strawberries already sweating. :(


Inside.

Cleaner-looking version of the inside. 


Enjoy!

Saturday, June 30, 2012

Food is what brings people together.

Tuesday, June 12, 2012


First day of work. Have a great week everyone!

xx

Monday, June 11, 2012

Pretty Pastel French Macarons


- - - - - - - - 
Ingredients
- 1 1/4 cups + 1 teaspoon confectioner's sugar
- 1 cup finely ground sliced, blanched almonds
- 6 tablespoons fresh egg whites (3 large eggs)
- Pinch of salt
- 1/4 cup granulated sugar
- 1 to 2 drops of food colouring
- 1/2 teaspoon liquid whitener for each colour


Steps
1. Preheat the oven to 175°C. 
2. In a medium bowl, whisk together confectioners' sugar and ground almonds. In the bowl of an electric mixer fitted with the whisk attachment, whip egg whites with salt on medium speed until foamy. Increase speed to high and gradually add granulated sugar. Continue to whip until stiff glossy peaks form. With a rubber spatula, gently fold in the confectioners' sugar mixture until completely incorporated.
3. Separate the batter into smaller bowls. Add food colouring and liquid whitener to each batch and fold.
* Liquid whitener is used to lighten the colour of macaron batter. If liquid whitener is not used, blue food colouring may turn green, red food colouring may turn orange, etc.
4. Line baking sheets with parchment paper; set aside. Pipe 1-inch disks onto prepared baking sheets, leaving 2 inches between cookies. The batter will spread a little. Let stand at room temperature until dry, and a soft skin forms on the tops of the macarons and the shiny surface turns dull (about 15 minutes).
5. Bake, with the door of the oven slightly ajar, until the surface of the macarons is completely dry, about 15 minutes. Remove baking sheet to a wire rack and let the macarons cool completely on the baking sheet. Gently peel off the parchment. Their tops are easily crushed, so take care when removing the macarons from the parchment. Use immediately or store in an airtight container, refrigerated for up to 2 days or frozen for up to 1 month.


Macaron filling is chocolate ganache.

Chocolate Ganache

Ingredients
- 1 cup baking chocolate
- 1 cup heavy cream


Steps
1. Chop up baking chocolate into smaller sizes.
2. Bring heavy cream to a boil in a double boiler, make sure that you stir it consistently to prevent the sides from burning.
3. Pour boiled heavy cream over chocolate, and stir until all chocolate has melted.
4. Set ganache to cool.

Sunday, June 10, 2012

'Some Serious Chocolate Business!' Cupcakes

Hello all!

To make up for my hiatus, I am going to share a simple cupcake recipe.
These cupcakes were made for my A-Levels classmates, PM6, and teachers, as a token of appreciation to them for being so supportive over the past half year.
PM6, this flog post is for you!


Moist chocolate cupcake with bittersweet chocolate lava center, topped with chocolate buttercream frosting.


Yield : about 24 cupcakes


Ingredients
Moist Chocolate Cupcakes
- 3 cups all purpose flour
- 1/2 cup unsweetened cocoa powder
- 2 cups granulated sugar (I personally like my cupcakes less sweet, using 1 1/2 cups of sugar)
- 2 tsp baking soda
- 1 tsp salt
- 2 cups brewed coffee (or 2 cups of warm water mixed with 3 teaspoons of espresso powder or instant coffee granules)
- 2 tbsp white vinegar
- 4 tsp vanilla extract
- 12 tbsp olive oil


Chocolate Buttercream Frosting
- 2 sticks of butter (226.8g), softened (but not melted!)
- 3 1/2 cups confectioners (powdered) sugar
- 1/2 cup cocoa powder
- 1/2 tsp table salt
- 2 tsp vanilla extract
- 4 tbsp milk or heavy cream


Lava Centre
- 1 cup baking chocolate
- 1 cup heavy cream


Steps
Moist Chocolate Cupcakes
1. Preheat oven to 350°F (180°C) with a rack in the middle position. Prepare a muffin tin with cupcake liners.
2. In a large bowl, vigorously whisk together the flour, cocoa powder, sugar, baking soda, and salt until there are no visible clumps (cocoa tends to clump up).
3. In a separate bowl, mix together the coffee, vinegar, vanilla extract, and olive oil.
4. Pour the wet ingredients into the dry ingredients and stir only until they just come together. The mixture should be thin and rather lumpy.
5. Ladle the batter into the cupcake liners, filling them about two-thirds of the way full. Place in oven and bake for 18 to 20 minutes, until a bamboo skewer inserted in the center comes out clean.
6. Remove from oven and let cool in the pan for 5 minutes, then remove from pan and let cool on a rack.


Chocolate Buttercream Frosting
1. Cream butter for a few minutes in a mixer with the paddle attachment on medium speed. Turn off the mixer.
2. Sift 3 cups powdered sugar and cocoa into the mixing bowl. Turn your mixer on the lowest speed (so the dry ingredients do not blow everywhere) until the sugar and cocoa are absorbed by the butter.
3. Increase mixer speed to medium and add vanilla extract, salt, and milk/cream and beat for 3 minutes.
* If your frosting needs a more stiff consistency, add a little more sugar. If your frosting needs to be thinned out, add additional milk 1 tablespoon at a time.


Lava Centre
* This is just the basic chocolate ganache.
1. Chop up baking chocolate into smaller sizes.
2. Bring heavy cream to a boil in a double boiler, make sure that you stir it consistently to prevent the sides from burning.
3. Pour boiled heavy cream over chocolate, and stir until all chocolate has melted.
4. Set ganache to cool.


Putting the cupcake together
1. Make a hole in the middle of the cupcake using a skewer or knife.
2. Fill hole with chocolate ganache.
3. Pipe chocolate buttercream onto cupcakes in any design you like. (Piping nozzle used in photo : 12mm, plain round tip)


Kitty cupcake just for fun. :3


Enjoy!